Maintain Route Numbers |
|

The Maintain Route Numbers program is used to Create New, Edit Existing, and sort by Defined Routes. Before adding a new route, see the Preceding Requirements.
|
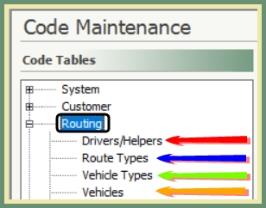
Navigate To: System>Configuration>Code Maintenance>Routing |
The following codes must be setup in Code Maintenance prior to adding a new route in Maintain Route Numbers.
- Define the types of Routes by description.
- Associate which Service Types will be used with each Route Type.
- Associate which Route Types will be used with each Vehicle Type.
- Vehicle
- Associate which Vehicle Type applies to this Vehicle (Truck).
- Maintain Route Numbers will only display the Trucks for the Vehicle Types associated with the Route Type selected.
- Drivers/Helpers
- Add both Drivers and Helpers.
- Drivers and Helpers can be interchanged and assigned differently as Drivers or Helpers on Routes.
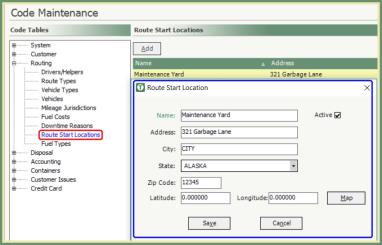
- Route Start Locations (optional)
- Define the location where the route will begin.
|
Maintain Route Numbers |
Navigate To: Routing>Route Maintenance>Maintain Route Numbers |
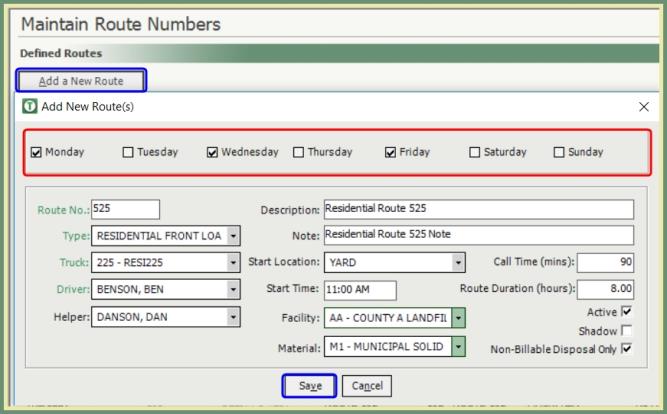
- Select the Days the route is required for.
- Enter a 3-digit route number.
- TRUX will insert a preceding day of the week number for each day this route is associated with.
- Example for Route 101 for each day of the week:
- Monday=1101, Tuesday=2101, Wednesday=3101, Thursday=4101, Friday=5101, Saturday=6101, Sunday=7101
- Enter Route Description (i.e., Residential Route - Town East Side).
- Select Type (Route Type).
- Select Truck for this route.
- Maintain Route Numbers will only display the Trucks for the Vehicle Types associated with the Route Type selected.
- This will be the default truck used for this route but can be changed during route scheduling and completing if needed.
- Select a Driver.
- This will be the default driver used for this route but can be changed during route scheduling and completing if needed.
- Select a Helper, if applicable.
- This will be the default helper used for this route but can be changed during route scheduling and completing if needed.
- Enter a Note (optional).
- Select a Start Location (optional).
- Where the truck will begin the route.
- Enter Start Time, Call Time, Route Duration if using Route Modeling.
- Facility & Material.
- Only used if this route will dispose at the same facility and use the same material for every time.
- Active. New routes default to active.
- When the active flag is not checked, the route is inactive.
- Routes cannot be deleted. Routes no longer used can be made inactive.
- If an Inactive route becomes usable, recall the route number and select the Active checkbox.
- Shadow: Used to quickly drop all permanent calls on this Route into the Unassigned Grid in Dispatch.
-
Example: Use Shadow setting to place all permanent Roll Off Calls on a Route.
-
When you Print and Schedule the Shadow Route, all the permanent Roll Off Calls are placed in Unassigned Call Maintenance so you can assign the calls to the actual driver that will be servicing the calls that day.
- Non-Billable Disposal Only.
-
With the flag checked the Disposal Ticket will go against the entire Route and not billed to a customer.
- Typically used in a Residential Contract where you only assign one customer to the route for Productivity and Disposal Ticket Tracking rather than setting up and routing every single home.
Can be used to select a sub-set of routes based on selecting criteria from the first gray line row of the grid.
- Sort By: Day of Week or Route Number
- All Days, (Route) Types, Trucks, Drivers, Helpers are included in the Define Routes grid by default.
- Click in the top row drop down list and sort the grid by specific or all Days, Type, Truck, Driver or Helper.
-
For example, if you only want to see Monday routes for Truck T101; click the Day drop down and select Monday; click in the top gray Truck row and click the drop down and select Truck 101.
- The grid will now be sorted and only display Monday routes for Truck 101.
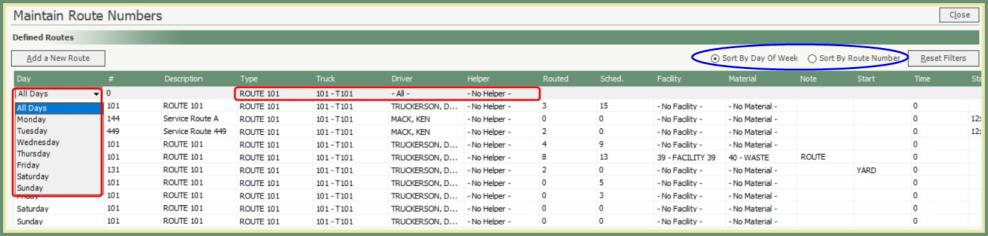
- Route details are listed under each column headers.
- Routes in Red are Inactive.
- Active Routes can be made Inactive by removing the Active check mark.
- Inactive Routes can be made Active by adding the Active check mark.
- Fields in Red are Inactive. (Driver, Helper, Truck, etc...).
- Add or Remove the checkbox to sort by NB (Non Billable), Shadow or Active routes.
- Click Reset Filters to clear sorting filters and reset to All.

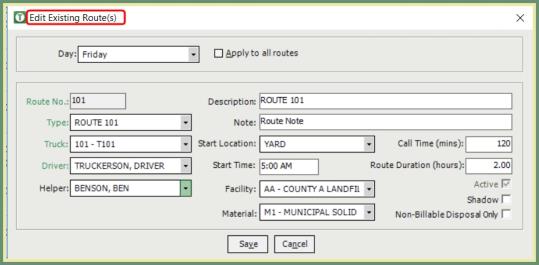
- Double click on a route in the Defined Routes grid.
- Make changes as needed.
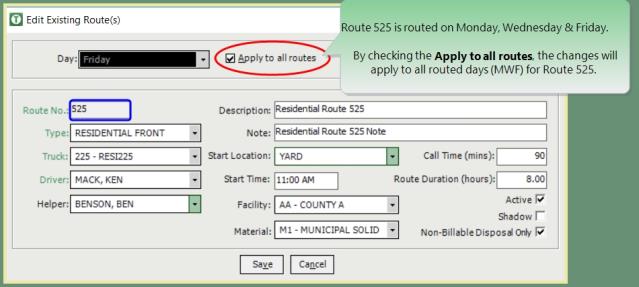
- Check Apply to all routes to apply the change to all the Days for this route.
- Save.